Sauna Lighting and Accessories Guide: LEDs, Thermometers and Safe Design
Sauna lighting and accessories should never be treated as afterthoughts. In a properly designed sauna, every component affects […]

Sauna design is not just about how the room looks. It is about where the heat goes, where the body sits and how air moves through the space. A sauna can be visually beautiful and still perform poorly if the layout is wrong. Benches may be too low, the ceiling may be too high, the heater may be placed without regard for airflow or the room may be oversized, under-ventilated or designed around aesthetics instead of thermal behavior.
Good sauna design begins with a simple principle: the body must be placed inside the usable heat zone. Ceiling height, bench height, room volume, heater position, ventilation, wood selection and glass placement all shape the final experience. These are not isolated design choices. They are connected performance decisions that determine whether the sauna feels balanced, breathable and consistent, or whether it simply becomes a hot room that never quite performs the way it should.
This guide explains how sauna design and layout work, why bench height matters so much and what homeowners should understand before building a custom sauna.
| Design Element | Why It Matters |
| Ceiling height | Determines where heat collects |
| Bench height | Positions the body in the usable heat zone |
| Bench depth | Affects comfort, posture and use |
| Room volume | Determines heater demand and heat stability |
| Heater placement | Influences heat distribution and steam response |
| Ventilation | Keeps air breathable and heat moving |
| Glass placement | Impacts heat loss and heater sizing |
| Door placement | Affects circulation, heat retention and flow |
| Materials | Shape comfort, thermal feel and durability |
| Cooling/rest flow | Completes the sauna experience |
Sauna design is the process of shaping a sauna’s layout, dimensions, materials and systems so the room performs as a controlled thermal environment. It is not just interior design. It is thermal design, and that distinction matters because a sauna must account for how heat rises, how air circulates, how steam moves, how materials respond to high temperatures and where users sit in relation to the heat source.
A well-designed sauna feels balanced and repeatable. Heat surrounds the body evenly, air remains breathable, steam responds when water is added to the stones and users can stay in the room long enough for the session to develop without feeling overwhelmed by stale air or uneven heat. A poorly designed sauna may still get hot, but the experience feels incomplete. That difference often comes down to layout.
The most important idea in sauna layout is the heat zone. Because hot air rises, the warmest air collects near the ceiling. Below that is the primary usable heat layer, where the sauna performs best for the body. Lower areas are cooler and less intense, which is why a successful sauna does not simply place benches wherever they fit. It places the user inside the active heat zone.
That means the ceiling, benches and heater cannot be designed separately. They must be planned together. If the ceiling is raised, bench height usually needs to be adjusted. If benches are too low, the body falls below the strongest usable heat. If the heater is poorly placed, heat and steam may not move through the room effectively. You do not design a sauna by filling a room with benches; you design the heat zone and place the body inside it.
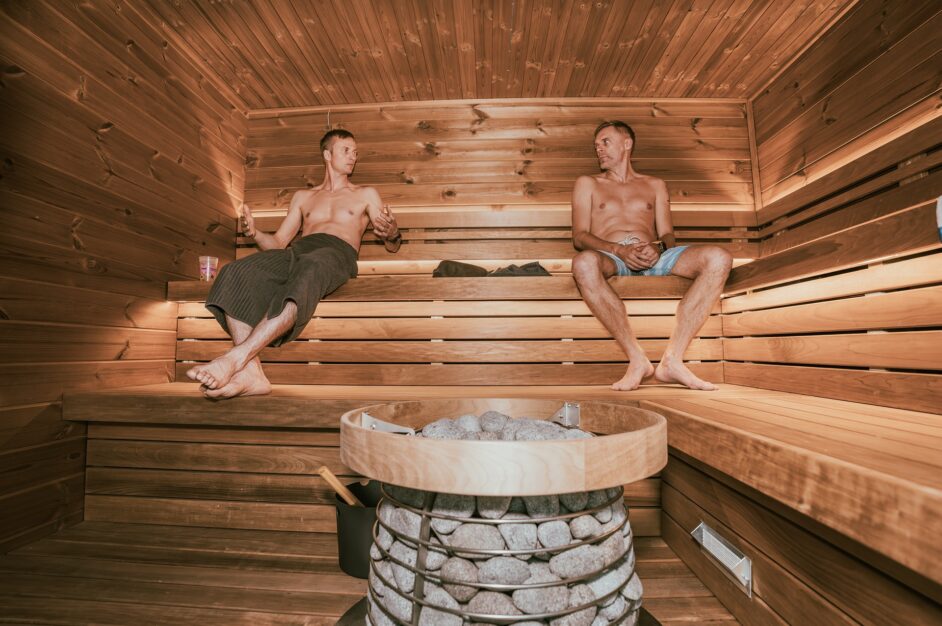
Bench height is one of the most important sauna design details because it determines how the body receives heat. If benches are too low, the user may experience warm air around the head and torso while the legs and feet remain cooler. That creates an uneven sauna experience that feels top-heavy rather than immersive.
A proper bench layout positions the body where heat is stable and useful. The upper bench is typically the primary sauna position, while the lower bench functions as a cooler zone, transition point or step level. A good layout gives users options while still preserving the main heat experience.
| Bench Issue | Result |
| Benches too low | Body sits below the best heat layer |
| Ceiling too high with low benches | Heat collects above the user |
| Poor lower bench design | Access becomes awkward or unsafe |
| Insufficient bench depth | Seating feels uncomfortable |
| Poor relationship to heater | Heat and steam may feel uneven |
| No thermal hierarchy | Users have fewer comfort options |
Bench layout should be treated as part of the sauna’s thermal system, not as furniture placement. A bench that looks correct in a drawing can still sit too low to deliver a proper experience.
Cold feet are one of the clearest signs of poor sauna layout. In a properly designed sauna, the feet should not sit far below the active heat layer. If they do, the body receives heat unevenly. The head may feel hot, but the lower body remains underheated, which changes the way the body responds to the room.
When the whole body is positioned inside the heat zone, the experience feels more immersive and stable. Heat surrounds the user instead of creating a top-heavy sensation. A sauna with cold feet may need more than a heater adjustment. It may have a bench-height, ceiling-height or heat-zone planning problem.
Ceiling height directly affects sauna performance. Many homeowners assume that a taller sauna feels more open and luxurious, and in a normal room, that may be true. In a sauna, extra height can create wasted heat volume because hot air rises and collects at the top of the room. If the ceiling is too high, the hottest air may sit above the user rather than around the body.
Good sauna ceiling height keeps the usable heat zone close to the bench. When ceiling height is planned correctly, heat stays closer to the body, the upper bench performs better, the room heats more efficiently and stratification is easier to manage. When ceiling height is wrong, no heater adjustment can fully correct the geometry because the room itself is working against the experience.
Room volume determines how much energy is required to heat the sauna, but volume is not the only factor that matters. Glass, tile, stone, concrete and outdoor exposure can all increase thermal load. A room with large glass panels, for example, may require more heater capacity than a similarly sized wood-lined room because glass loses heat more quickly.
Heater sizing should account for the full behavior of the space, not just a basic square-foot calculation.
| Factor | Impact |
| Cubic volume | Determines baseline heater demand |
| Ceiling height | Affects heat concentration and stratification |
| Glass area | Increases heat loss |
| Tile or stone | Adds thermal mass and changes heat-up behavior |
| Outdoor exposure | Increases energy demand |
| Insulation | Affects heat retention |
| User capacity | Influences recovery needs |
| Stone mass | Shapes steam response and heat stability |
An undersized heater can produce slow heat-up, weak steam and unstable performance. An oversized heater can also create problems because it may heat the air too quickly before the stones absorb enough energy, resulting in sharp heat and poor steam quality. The goal is not the biggest heater. The goal is a balanced system.
Heater placement affects how heat and steam move through the sauna. The heater should not be placed only where it looks best or where it happens to fit most easily. It should be located where it supports heat distribution, bench layout, airflow and safety clearances.
The stones inside or around the heater are equally important because they store heat, release radiant warmth and create steam when water is added. Without enough properly heated stone mass, the sauna may feel thin or harsh. With strong stone mass and correct placement, the heat feels deeper, more stable and more responsive.
| Heater/Stone Design Factor | Why It Matters |
| Heater location | Shapes heat and steam movement |
| Stone volume | Affects heat storage and steam quality |
| Clearances | Supports safety and airflow |
| Relationship to benches | Influences user comfort |
| Airflow path | Helps distribute heat and steam |
| Service access | Supports long-term maintenance |
The heater enables the experience, but it does not define it by itself. The room has to be designed around how the heater performs within the larger system.
Ventilation is one of the most overlooked parts of sauna layout, even though it has a direct effect on comfort and performance. A sauna is not only a hot room. It is a breathing environment, and the quality of the air affects how long users can stay in the room and how the heat feels over time.
Fresh air should enter the sauna, interact with the heater, move through the occupied zone and exit through a planned exhaust path. This helps maintain oxygen quality, distribute heat and prevent the room from feeling stale or oppressive. Poor airflow can make a sauna feel hot but unpleasant, shortening sessions and making steam feel sharp, heavy or uneven. Ventilation should be integrated into the design early rather than treated as an afterthought after the room is already built.
A basic sauna ventilation strategy includes fresh air intake and exhaust. The intake is often placed near the heater, allowing incoming air to warm and join the natural convective flow. The exhaust should help draw air through the occupied zone rather than simply allowing hot air to escape.
| Ventilation Element | Design Purpose |
| Intake | Introduces fresh air |
| Heater interaction | Warms incoming air and supports circulation |
| Occupied zone airflow | Moves air where users sit |
| Exhaust | Removes stale air, moisture and carbon dioxide |
| Balance | Maintains comfort without excessive heat loss |
The goal is balanced airflow. Too little airflow creates stagnation, while too much airflow can disrupt heat retention. The correct layout allows the sauna to breathe without weakening the experience.
Bench layout should be designed around user capacity, comfort, heat position and room geometry. The best layout is not always the one that seats the most people. A sauna should be designed for usable thermal seating, not just maximum occupancy. A lower bench that sits outside the heat zone may technically add seating, but it may not deliver the intended experience.
| Layout Type | Best For | Considerations |
| Straight bench | Compact saunas and narrow rooms | Simple and efficient |
| L-shaped bench | Small group use and corner rooms | Improves seating flexibility |
| Opposing benches | Social sauna layouts | Requires adequate room width |
| U-shaped bench | Larger custom saunas | Best for social or multi-user experiences |
| Lounge bench | Relaxation-focused personal saunas | Requires more depth and space |
| Tiered benches | Traditional heat-zone control | Strong option for performance-focused design |
A compact sauna may perform better with a simple straight bench than with a forced layout that tries to over-seat the room. Larger saunas can support more complex arrangements, but only if the heat zone, airflow and heater placement are planned together.
Door placement affects heat retention, user movement and how the sauna connects to the surrounding space. A poorly placed door can disrupt the bench layout, interfere with heater placement or make the sauna feel awkward to enter and exit. It can also affect heat loss every time the door opens.
Door planning should consider entry path, heater clearances, bench access, swing direction, glass area, privacy and the relationship to showers, cold plunge or rest areas. The sauna should be easy to use without compromising thermal performance. Flow matters because a sauna that is inconvenient to enter, exit, cool down from or return to will not be used as naturally.
Glass can make a sauna feel more open, modern and connected to the surrounding space, but glass also changes thermal performance. Unlike wood, glass loses heat more quickly. Large glass areas increase the heater demand and may affect how evenly the room stabilizes.
This does not mean glass should be avoided. It means it must be accounted for in the design.
| Glass Design Choice | Performance Impact |
| Full glass wall | Strong visual effect but higher heat loss |
| Glass door | Common and manageable when planned correctly |
| Small window | Adds openness with less thermal impact |
| Corner glass | Can elevate design but may require heater adjustment |
| Exterior-facing glass | Requires added consideration for exposure and heat loss |
A modern sauna can use glass beautifully, but performance should lead the design. The room should not sacrifice heat quality for a rendering.
Wood selection affects more than appearance. The interior wood surface shapes the thermal feel, scent, comfort and aging of the sauna. It must remain comfortable to the touch and stable through repeated cycles of heat and moisture, especially on benches and backrests where the body makes direct contact.
Good sauna wood should be properly dried, stable under heat, comfortable against skin, low in problematic resin, smooth and well-milled. Different wood species create different atmospheres. Some are aromatic and warm-toned, while others are lighter, cleaner and more neutral. The right material depends on the design goal, but the decision should always include performance because wood is not just a finish. It is part of the system.
Indoor and outdoor sauna layouts share many principles, but they also have different constraints. Indoor saunas must integrate with the home’s structure, electrical systems, ventilation paths and moisture control. Outdoor saunas must account for weather exposure, foundation, insulation, exterior materials and access.
| Design Factor | Indoor Sauna | Outdoor Sauna |
| Surroundings | Built into conditioned space | Exposed to outdoor conditions |
| Moisture control | Critical for surrounding walls | Critical for durability and weather resistance |
| Utilities | Routed through home systems | May require trenching or exterior routing |
| Cooling | Often shower or indoor rest area | Can include outdoor air, plunge or patio |
| Design integration | Interior architecture | Landscape and exterior architecture |
| Heat loss | Usually lower | Usually higher |
The layout should reflect where the sauna lives. A successful indoor sauna feels integrated with the home, while a successful outdoor sauna feels connected to the landscape and the broader thermal routine.
Commercial saunas require a different level of layout planning because they operate under heavier use. Doors open more frequently, occupancy changes constantly, heat recovery matters more and airflow has to support multiple users at once. Materials also experience more wear, which means durability and serviceability become much more important.
Residential sauna design can be more personal and flexible, but the same fundamentals still apply.
| Layout Concern | Residential Sauna | Commercial Sauna |
| User load | Lower and more predictable | Higher and more variable |
| Heat recovery | Important | Critical |
| Airflow | Essential | Essential under load |
| Bench durability | Moderate to high | Very high |
| Accessibility | Project-dependent | Often a core requirement |
| Steam frequency | User preference | Often repeated and intensive |
| Maintenance access | Helpful | Required |
The more users a sauna must support, the more disciplined the layout needs to be. Commercial and event saunas often fail because fundamentals are ignored at scale.
The sauna room is only part of the experience. Cooling and rest complete the sauna cycle, so a good layout considers where users go after heat exposure. This may include a shower, cold plunge, outdoor cooling area, lounge seating, towel storage or quiet transition space.
Without cooling and rest, the sauna experience feels incomplete. The design should make the full cycle intuitive, from entering the heat to cooling down, resting and returning for another round. Safe flooring outside the room, easy towel access, drinking water, privacy and a comfortable place to sit all influence how naturally the sauna becomes part of a routine.
A sauna can look beautiful and still perform poorly. Heat behavior, airflow and user positioning should lead the design, with aesthetics supporting those fundamentals rather than overriding them.
Low benches or single level benches place the body below the primary heat zone, which creates uneven heat and cold feet. This is one of the most common layout failures in modern sauna design.
Extra height can trap heat above the user and waste energy. The ceiling should support the usable heat zone instead of creating unnecessary volume.
The heater should be positioned for heat distribution, steam response, airflow and clearances, not only convenience. A heater that looks correct in a rendering may still perform poorly if it is not integrated with the room.
Without airflow, the sauna can feel stale, heavy and uncomfortable even when it is hot. Ventilation should be designed into the layout from the beginning.
A larger sauna is not always better. Oversized rooms require more heater capacity and may be harder to stabilize, especially when glass or exterior exposure adds thermal load.
Glass can be beautiful, but it increases heat loss. It must be included in heater sizing and thermal planning so the sauna still performs as intended.
Lower benches are cooler. They are useful for transition and access, but they may not deliver the primary sauna experience if they sit outside the active heat zone.
The sauna experience includes cooling, rest and re-entry. The surrounding layout should support the full cycle, not just the heated room.
Before finalizing a sauna layout, review each of the following design questions. These details may seem separate, but together they determine whether the sauna will feel balanced and perform consistently.
| Question | Why It Matters |
| Is the ceiling height appropriate? | Keeps heat in the usable zone |
| Are benches high enough? | Positions the body correctly |
| Is the room volume matched to the heater? | Supports stable performance |
| Is stone mass adequate? | Improves steam and heat quality |
| Is ventilation designed? | Keeps air breathable and balanced |
| Does the layout support safe movement? | Improves usability |
| Is glass accounted for? | Prevents unexpected heat loss |
| Are materials sauna-appropriate? | Supports comfort and durability |
| Does the door placement make sense? | Affects flow and heat retention |
| Is cooling/rest space included? | Completes the experience |
| Does the layout match intended use? | Ensures the sauna supports real routines |
If the layout does not support heat behavior, it should be revised before construction begins. It is far easier to correct these issues in design than after the sauna is built.
A great sauna does not happen because the room looks warm, modern or expensive. It happens because the fundamentals are correct. The ceiling height holds heat where it can be used, the benches place the body in the active heat zone, the heater and stones are matched to the room, ventilation keeps air moving, materials perform under heat and moisture, and the surrounding layout supports cooling, rest and repeated use.
A sauna is simple in its essential elements: heat, air, water, wood and stone. But that simplicity leaves very little room for poor design. If you want a sauna that feels balanced, breathable and consistent, the layout has to be planned around performance from the beginning. Design the heat zone first, and everything else follows.
The best sauna layout depends on the space, user capacity and desired experience. A strong layout positions the upper bench in the primary heat zone, supports proper airflow, places the heater effectively and allows safe movement through the room.
Bench height matters because heat rises. If the benches are too low, the body may sit below the best heat layer, causing uneven heat and cold feet.
A common high-performing layout includes tiered benches, with an upper bench in the primary heat zone and a lower bench or step for access and cooler seating. Larger saunas may use L-shaped, opposing or U-shaped benches depending on the room.
Ceiling height determines where heat collects. If the ceiling is too high, heat may rise above the user and become wasted. Proper ceiling height helps keep heat around the occupied bench area.
Not always. A bigger sauna requires more heater capacity and may be harder to stabilize. The best sauna size is based on user capacity, heat performance and layout quality.
The heater should be placed where it supports heat distribution, steam movement, airflow and safety clearances. It should be coordinated with bench layout and room geometry.
Yes. Ventilation affects how heat, air and steam move through the room. Intake and exhaust placement should be planned with the heater and bench layout.
Yes, but glass increases heat loss and should be accounted for in heater sizing and thermal design. Large glass areas can look beautiful but must be planned carefully.
Cold feet are usually caused by poor bench height, excessive ceiling height or incorrect heat-zone planning. The body may be sitting below the primary heat layer.
Indoor sauna design must integrate with the home’s wall assembly, ventilation, electrical systems and moisture control. Outdoor sauna design must also account for weather exposure, foundation, insulation and exterior durability.
One of the most common mistakes is designing the sauna visually before designing the heat zone. A sauna should be planned around thermal performance first.
Custom sauna design is often worth it for homeowners who want a long-term, high-performing wellness space. It allows the layout, heater, ventilation, materials and surrounding routine to be designed together.